The Magic Behind the Screen: Why Green Screen Technology Matters
Ever wondered how weather forecasters appear to stand in front of elaborate maps, or how Hollywood places actors in fantastical worlds they've never actually visited? The answer is green screen technology, also known as chroma keying—a production technique that opens unlimited creative possibilities for video content creators.
At M&M Communications, we've helped countless businesses leverage green screen technology to create professional video content that would otherwise require impossible locations, elaborate sets, or production budgets beyond reach. From product demonstrations with custom backgrounds to corporate videos featuring global locations filmed entirely in-studio, green screen democratizes high-production-value content.
The technology isn't just for Hollywood anymore. With affordable equipment and accessible software, businesses of all sizes can harness chroma key techniques to create compelling video content that engages audiences and drives results. Understanding the fundamentals—proper lighting, equipment selection, and post-production techniques—separates professional-looking results from amateur green screen disasters.
Understanding Green Screen and Chroma Key Technology
Chroma key is a visual effects technique that makes a specific color in footage transparent, allowing you to replace it with different imagery—another video, static image, or computer-generated graphics. While the technique works with any color, green has become the standard for several practical reasons.
Why Green? The Science Behind the Color Choice
Green screens dominate professional production because green is furthest from human skin tones on the color spectrum. This allows clean separation between subject and background without affecting the talent's appearance. Green also reflects more light than other colors, making it easier to create even illumination—critical for smooth keying.
Blue screens offer an alternative, particularly useful when subjects wear green clothing or have green props. The choice between green and blue depends on your specific production requirements. Digital camera sensors are also more sensitive to green light, providing cleaner keying results with less noise.
How Chroma Keying Works: The Technical Process
Chroma key software analyzes each frame of your footage, identifying pixels that match the specified key color (green or blue). These matching pixels become transparent, revealing whatever background layer you place behind the footage. Advanced keying algorithms evaluate not just exact color matches but also variations in hue, saturation, and luminance to create clean edges without obvious halos or fringing.
The quality of your key depends on three factors: even lighting on the background, sufficient separation between subject and screen, and proper exposure maintaining clean color values. Master these fundamentals, and chroma keying becomes straightforward. Ignore them, and you'll spend hours in post-production trying to fix problems that should have been addressed on set.
Essential Equipment for Green Screen Production
Green Screen Backdrops: Materials and Options
Fabric Screens: Professional muslin or polyester green screens offer portability and easy storage. Look for wrinkle-resistant materials with matte finish to avoid reflective hotspots. Prices range from $50 for basic 6x9 ft screens to $300+ for professional seamless backgrounds.
Collapsible Pop-Up Screens: Spring-loaded circular screens ($80-150) provide convenience for mobile productions or small spaces. Limited to smaller subjects but extremely portable and quick to set up.
Painted Walls: For permanent installations, painting a wall or cyclorama with chroma key green paint ($50-200 per gallon) provides a seamless background. Requires proper surface preparation and multiple coats for even color.
Vinyl Screens: Durable and easy to clean, vinyl screens ($100-400) work well for high-traffic studios. Heavier than fabric but resist wrinkles and maintain consistent color over time.
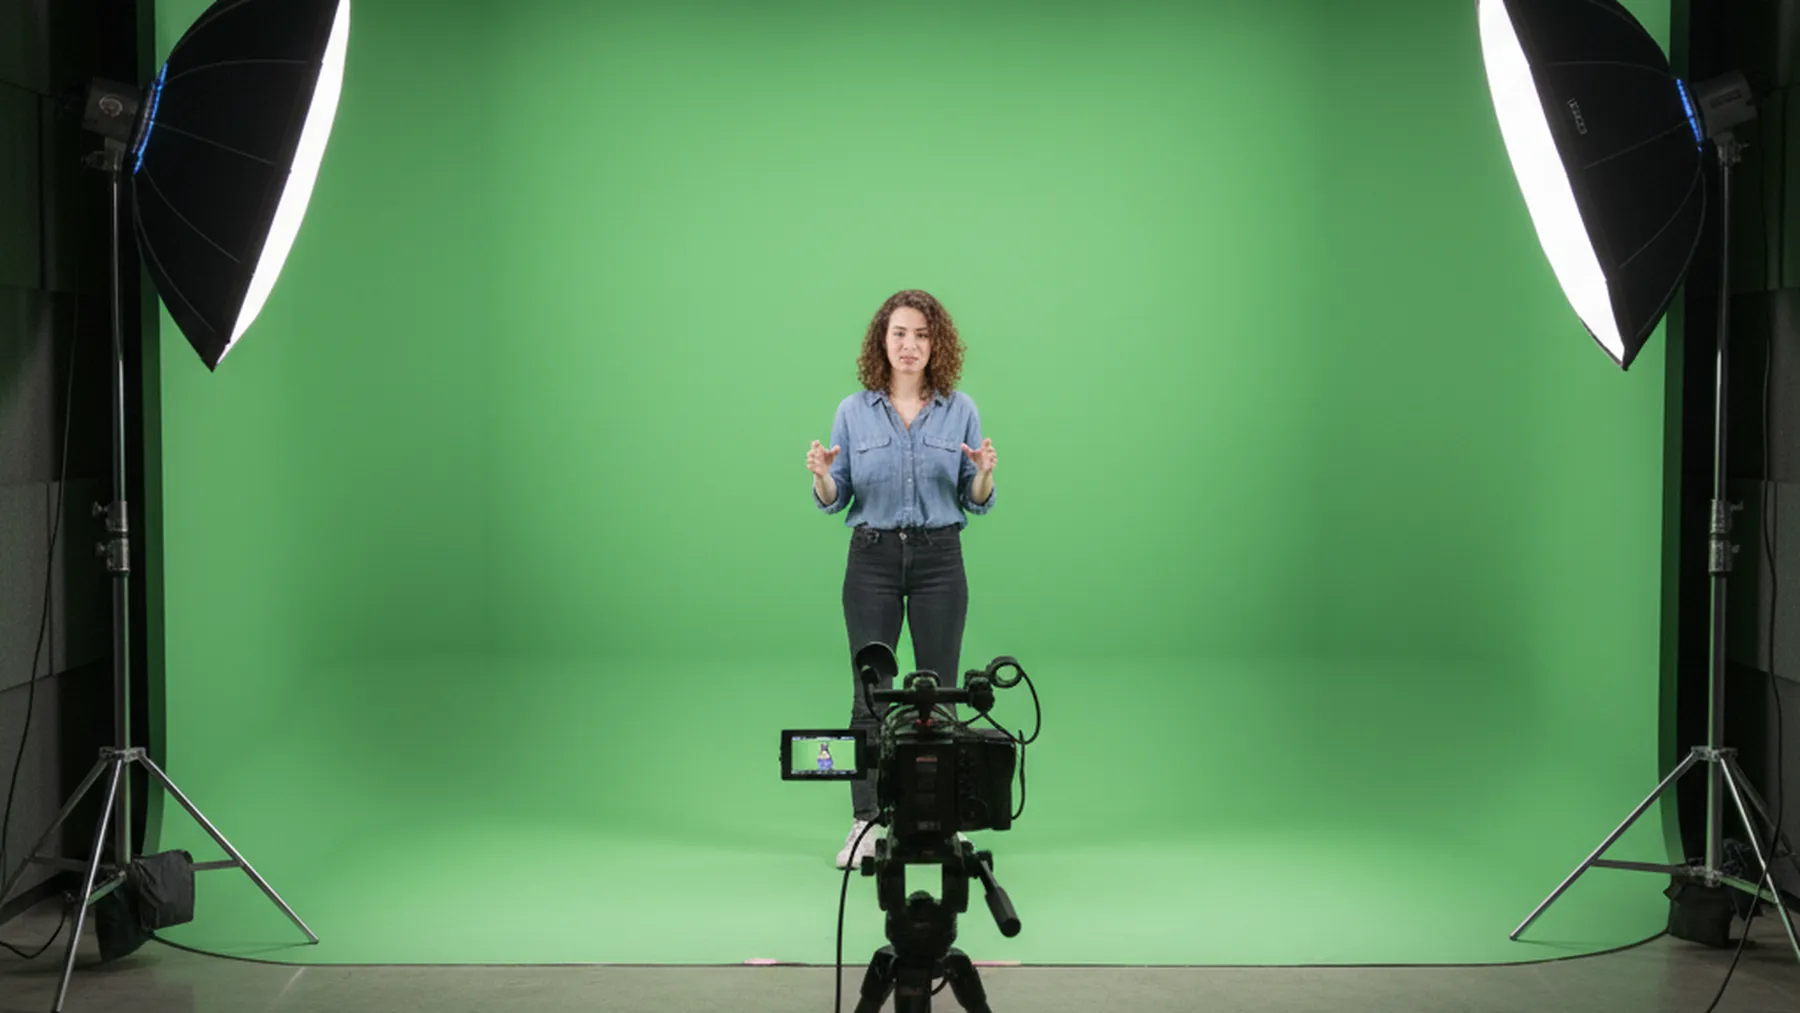
Lighting Equipment: The Make-or-Break Factor
Proper lighting separates professional green screen work from amateur attempts. You need two distinct lighting setups: one for the green screen itself, and another for your subject.
Background Lighting: Soft, even illumination across the entire green screen prevents shadows and color variations that complicate keying. Use softboxes, LED panels, or fluorescent fixtures positioned at 45-degree angles to the screen. Budget $200-500 for adequate background lighting.
Subject Lighting: Three-point lighting remains the gold standard—key light providing primary illumination, fill light reducing shadows, and backlight separating subject from background. LED panels offer adjustable color temperature and brightness. Professional kits range from $300 (entry-level LED panels) to $2,000+ (high-CRI professional fixtures).
Light Meters: Professional productions use light meters ($150-400) to measure and match illumination across the green screen, ensuring consistent keying. While not essential for beginners, they eliminate guesswork in complex setups.
Camera Considerations
Almost any digital camera can shoot green screen footage, but certain features improve results significantly.
High Resolution: 4K capture provides flexibility in post-production, allowing you to adjust framing without quality loss. Even if your final delivery is 1080p, starting with 4K improves edge quality after keying.
Manual Controls: Lock exposure, white balance, and focus to maintain consistency across takes. Auto settings that adjust during shooting create keying nightmares in post-production.
Low Compression: Shoot in formats with minimal compression (ProRes, RAW) when possible. Heavy compression creates artifacts around edges that complicate clean keying. If shooting in compressed formats, use the highest bitrate available.
Support Equipment
Stands and Mounting: Backdrop support stands ($100-300) hold your green screen taut and wrinkle-free. C-stands and clamps provide versatility for positioning lights and accessories.
Sandbags: Weight down stands for safety, especially with larger screens and lighting fixtures. Budget $50-100 for a set of quality sandbags.
Gaffer Tape and Clips: Essential for securing screens, managing cables, and making quick adjustments on set. Always have multiple rolls available.
Lighting Setup: The Foundation of Quality Keying
Three-Point Lighting for Subject
Key Light: Your primary light source, typically positioned 45 degrees to the side and above your subject. This creates dimension and defines features. Use a softbox or diffused LED panel to create flattering, even illumination without harsh shadows.
Fill Light: Positioned opposite the key light at lower intensity (typically 50% of key light power) to soften shadows without eliminating them entirely. This maintains dimension while preventing excessive contrast.
Backlight (Rim Light): Behind and above the subject, creating a subtle edge highlight that separates them from the background. This is particularly important for green screen work as it prevents green spill from contaminating subject edges.
Green Screen Illumination Best Practices
Even Coverage: Illuminate the green screen separately from your subject with consistent light across the entire surface. Use multiple lights positioned at equal distances to avoid hotspots or dark areas.
Distance Matters: Position your subject at least 6-8 feet from the green screen when possible. This prevents green light from reflecting onto your subject (green spill) and allows you to light each element independently.
Avoid Shadows: The subject's shadow on the green screen creates dark areas that key differently, appearing as semi-transparent regions in your final composite. Proper distance and lighting angles eliminate this problem.
Managing Green Spill
Green spill—light from the green screen reflecting onto your subject—creates green color casts on edges, particularly on reflective surfaces like hair, glasses, or shiny clothing. Combat this with:
Adequate separation: More distance between subject and screen reduces spill dramatically.
Backlight intensity: Strong backlighting overpowers green spill on subject edges.
Color correction: In post-production, use selective color grading to remove green casts from subject without affecting the key.
Production Techniques for Clean Keys
Wardrobe Considerations
Avoid any clothing, props, or accessories in the same green as your screen—they'll become transparent in the final composite. This seems obvious, but subtle greens in patterns or jewelry often surprise inexperienced productions.
Highly reflective materials (sequins, metallics, glass) pick up green screen reflections, complicating keying. When possible, choose matte fabrics and surfaces. If reflective materials are essential, increase subject-to-screen distance and adjust lighting to minimize spill.
Camera Settings for Optimal Keying
White Balance: Set custom white balance before shooting and lock it. Shifting color temperature between takes creates inconsistent green screen color, requiring separate keying for each clip.
Shutter Speed: Use appropriate shutter speeds for your frame rate (typically 1/50s for 24/25fps, 1/60s for 30fps) to maintain natural motion blur. Faster shutter speeds create unnaturally sharp edges that look artificial in composites.
Aperture: Shoot at f/5.6 to f/8 when possible for optimal sharpness with sufficient depth of field. Avoid very shallow depth of field (f/2.8 or wider) which can make background keying inconsistent.
ISO: Use the lowest ISO practical for your lighting to minimize noise. Digital noise makes keying more difficult and reduces edge quality in final composites.
Talent Direction and Movement
Brief talent about green screen limitations before shooting. Fast movements create motion blur that becomes semi-transparent in keying. While some blur is desirable for realism, excessive movement complicates post-production.
Maintain consistent distance from the green screen. Actors stepping toward or away from the background change the lighting conditions, creating variations in the key color that complicate keying.
Post-Production: Software and Keying Techniques
Adobe After Effects: Industry Standard Compositing
After Effects provides professional-grade keying tools with Keylight—a sophisticated chroma key plugin that handles complex scenarios including fine hair detail and semi-transparent elements.
Basic Keylight workflow: Apply the Keylight effect to your green screen footage. Use the eyedropper to select your green screen color. Adjust Screen Gain to expand the key to include slight color variations. Use Screen Balance to fine-tune edge detail. Check results against both black and white backgrounds to identify problems.
Advanced refinement: Use Screen Matte controls to clean up the alpha channel. Apply slight blur to the matte to smooth edges. Add color correction to remove remaining green spill. Stack multiple Keylight instances for difficult footage, isolating problematic areas.
DaVinci Resolve: Free Professional Alternative
DaVinci Resolve's Fusion page offers professional compositing capabilities at no cost. The Primatte keyer provides user-friendly controls with professional results.
Primatte workflow: Add a Primatte node to your footage in Fusion. Select your background color with the Pick BG tool. Use Auto Compute to generate an initial key. Refine with Clean BG and Clean FG tools to perfect edges. Adjust Spill Suppression to remove color casts.
Color grading integration: Resolve's strength lies in seamless integration between keying and color grading. After creating your composite, match color and lighting between subject and background using the Color page for photorealistic results.
Final Cut Pro: Mac-Native Workflow
Final Cut Pro's Keyer effect provides straightforward chroma keying with real-time preview on Apple Silicon Macs. While less sophisticated than After Effects' Keylight, it handles most green screen scenarios efficiently.
FCP workflow: Apply the Keyer effect to your green screen clip. Use the eyedropper to sample your green screen. Adjust Strength to expand the key. Refine edges with the Edge controls. Use the View popup to examine your matte quality.
Common Keying Problems and Solutions
Green spill on edges: Add a Spill Suppression effect or manually color-correct green casts using HSL qualification to target only the contaminated areas.
Rough or jagged edges: Apply slight edge blur to soften transitions. Ensure you shot with motion blur enabled (proper shutter speed) rather than trying to add it in post.
Semi-transparent areas: Usually caused by uneven green screen lighting or color variations. May require manual rotoscoping to clean up or re-shooting with better lighting.
Noise in the matte: Apply light noise reduction before keying. Denoise specifically in the green channel for best results without affecting overall image quality.
Creative Applications and Use Cases
Product Demonstrations with Custom Environments
Showcase products in ideal settings without expensive location shoots. Film talent demonstrating products on green screen, then composite them into environments that reinforce brand messaging—kitchens for cooking products, offices for business software, outdoor scenes for recreational gear.
Virtual Sets for Corporate Communications
Replace expensive physical sets with virtual backgrounds that can change for different videos without rebuilding. Create a library of background environments—boardrooms, tech spaces, casual settings—and shoot multiple videos in a single session with varied looks.
Educational Content and Explainer Videos
Position instructors alongside graphics, animations, or demonstrations. Green screen allows instructors to gesture toward and interact with visual elements added in post-production, creating engaging educational content.
Travel and Tourism Content
Create destination marketing videos featuring hosts in exotic locations without travel budgets. While nothing replaces authentic on-location shooting, green screen enables preview content, seasonal variations, or historical comparisons filmed entirely in-studio.
Special Effects and Creative Projects
Place talent in impossible locations—flying through clouds, standing on mountaintops, inside computer circuits. Green screen removes creative limitations, allowing imagination to guide your productions.
Budget Breakdown: Setting Up Your Green Screen Studio
Minimal Budget Setup ($300-500)
- 6x9 ft fabric green screen: $50-80
- Support stand: $60-100
- Basic LED panel kit (3 lights): $150-200
- Light stands: $40-60
- Software: Free (DaVinci Resolve)
This entry-level setup handles simple productions—single subject, minimal movement, forgiving backgrounds. Adequate for YouTube content, basic corporate videos, or learning the fundamentals before investing more.
Professional Budget Setup ($1,500-3,000)
- 10x20 ft seamless green screen: $200-400
- Heavy-duty support system: $300-500
- Professional LED panel kit (5+ lights): $800-1,200
- Light meter: $200-300
- Software: Adobe Creative Cloud ($55/month)
- Accessories (sandbags, stands, clips): $200-300
This professional setup delivers broadcast-quality results suitable for client work, commercial productions, or serious content creation. Handles multiple subjects, complex movements, and demanding keying scenarios.
Studio/Broadcast Setup ($5,000-15,000+)
- Cyc wall (painted or permanent): $2,000-5,000
- Professional lighting grid: $3,000-6,000
- High-end LED Fresnel lights: $2,000-4,000
- Professional monitoring: $1,000-2,000
- Dedicated green screen software and rendering: $500-1,000
Full studio installations for production houses, broadcast facilities, or high-volume content creation. Enables complex productions with multiple cameras, large subjects (vehicles, sets), and demanding technical requirements.
Common Mistakes and How to Avoid Them
Wrinkled or Creased Screens
Wrinkles create shadows and lighting variations that complicate keying. Steam fabric screens before shooting. If wrinkles persist, position lights to minimize shadow impact. For permanent installations, stretch screens tight or use painted surfaces.
Insufficient Subject-to-Screen Distance
Placing subjects too close creates green spill and prevents independent lighting of screen and subject. Maintain at least 6 feet separation, more when possible. Small spaces require creative lighting solutions or acceptance of increased post-production work.
Inconsistent Lighting
Uneven green screen illumination forces different keying settings for different parts of the frame. Measure light levels across your screen with a light meter or camera meter. Adjust fixture positions until variation stays within 1/2 stop across the entire surface.
Wrong Color Temperature
Mixing daylight (5600K) and tungsten (3200K) lights creates color variations across the green screen. Use all fixtures with matching color temperature. If mixing is unavoidable, gel lights to match or adjust in post-production.
Moving Backgrounds
Using video backgrounds with the wrong perspective or movement creates obvious composites. Match camera angle, height, and movement between foreground and background. Static backgrounds often look more believable than moving ones unless carefully coordinated.
Advanced Techniques for Professional Results
Match Lighting Between Foreground and Background
After keying, the composite only looks realistic if lighting matches between subject and background. Analyze your background's light direction, color temperature, and quality, then replicate it in your subject lighting. Add simulated environmental lighting (warm glow from a sunset background, cool light from an office scene) to sell the illusion.
Add Depth with Shadows and Reflections
Real environments include contact shadows where objects meet surfaces and reflections on shiny floors or water. Create these elements in post-production—duplicate your subject layer, blur and darken for shadows, flip and distort for reflections, then composite them appropriately on your background.
Motion Blur and Depth of Field Matching
If your background has motion blur or shallow depth of field, add matching effects to your subject in post-production. This integration makes composites more believable by ensuring visual consistency between all elements.
Edge Detail Enhancement
Fine detail like hair requires special attention. Use dedicated tools like Primatte's hair detail controls or After Effects' advanced spill suppression. Consider shooting separate passes with different keying optimizations for body and hair, then combining them in post.
Emerging Trends in Green Screen Technology
LED Volume Stages
Large LED walls displaying real-time background environments are replacing green screens in high-end productions. This technology—used in The Mandalorian—provides realistic lighting interaction and camera perspectives but costs hundreds of thousands to millions of dollars.
AI-Assisted Keying
Machine learning algorithms now handle complex keying scenarios automatically, analyzing footage to separate foreground from background even with challenging elements like fine hair, motion blur, or semi-transparent materials. This technology improves rapidly, making clean keys achievable with less perfect production conditions.
Real-Time Compositing
Game engine technology enables real-time background compositing during shooting, allowing talent and directors to see the final composite on-set rather than waiting for post-production. This improves performance and creative decision-making but requires significant technical infrastructure.
Conclusion: Mastering the Green Screen for Creative Freedom
Green screen technology democratizes high-production-value video creation, removing location limitations and budget constraints that would otherwise make ambitious projects impossible. From simple product demonstrations to complex visual effects, chroma keying opens creative possibilities limited only by imagination.
Success requires mastering the fundamentals—proper lighting technique, adequate equipment, thoughtful production planning, and post-production refinement. The difference between amateur green screen disasters and professional results isn't expensive equipment; it's understanding and implementing best practices consistently.
At M&M Communications, we've seen countless projects transformed by effective green screen implementation. Businesses that once felt limited to basic talking-head videos now create dynamic content in any environment imaginable. The investment in equipment and skills pays dividends through increased production flexibility, reduced location costs, and enhanced creative capabilities.
Whether you're creating corporate communications, marketing content, educational videos, or creative projects, green screen technology belongs in your production toolkit. Start with the basics, practice the fundamentals, and gradually expand your capabilities as your skills and ambitions grow.
Ready to explore how green screen production can elevate your video content? M&M Communications offers complete green screen production services and consultation to help businesses create professional content without limitations. Contact us at 0909 123 456 or email hello@mmcom.vn to discuss your vision and how we can help bring it to life.